Adding Flaps in iNav, the best way!
This article may be called Adding custom Flaps in iNav. But honestly, we’re going to cover much more than that. By the time you reach the bottom, you will have seen how to add flaps, crow (butterfly) braking, full span ailerons, flaperons, and spoilerons. You’ll also see how to make them switchable. By the way, this is also a video which you can find here.
Doesn’t iNav have a flaps thing on the mixer?
Sort of. On the mixer page there is an option under the Airplane type that shows Flaps. However, all is not as it seems. By selecting this option, all it does is enable the Flaperons mode to be visible on the modes page. The other strange thing is that if you don’t enable this, iNav adds two Flaps channels on the mixer anyway. If you check out the video, you will see how this works. It basically adds anaemic flaperons when you enable the mode.
Ultimately, I don’t think this is a great solution. Firstly, iNav uses the two contradictory terms of Flaps (mixer) and Flaperons (modes) here. These are two different functions on the control surfaces; so this only leads to confusion. By default, the function is flaperons. The thing is, you could assign the Flaps lines in the mixer to two new servo outputs. Then they would be flaps. But, the amount of flap deployed would still be low. Plus you only have a simple on/off control.
Can we do better?
The simple answer is yes. We can have our flaps/flaperons with control over how much they deploy. However, this can grow to a not-so-simple answer, as we can add levels of complexity to the functions.
Overview of the functions
So I thought that before starting with the tutorial; I would briefly go over what we will be achieving here. Furthermore, there are a few things common to all these setups that would make sense to cover in one place.
The first important thing to note here is that all of these functions, with the exception of full-span ailerons, you can only use on an plane with a tail. The tail and horizontal stabiliser balances these functions. Also, if you only have elevons, using flaperons or spoilerons is just adding up or down elevator. It won’t have the desired effect.
Next is the wiring of the flap servos themselves. This is dependant on the configuration of the servos in the wing, and the functions you want to use. If you only want to use flaps and/or crow, you can use a Y lead… if both control surfaces move the same way. If not, or you also want to use full-span ailerons; you will need to hook up each flap servo to a separate servo output.
Finally, all the setup instructions for each function will be starting with a fresh Airplane mixer in iNav, with the Flaps option disabled. Also, delete the two flaps lines that iNav adds in the default mixer settings. You can click all the images for the full size version.
The setups covered
As I mentioned earlier, we are not just adding flaps in iNav. In this tutorial, we will be covering (in order):
- Flaperons
- Spoilerons
- Flaps
- Crow/Butterfly braking
- Full-span ailerons
Transmitter setup
For all of these functions, except for full-span ailerons, we do need to make a change on our transmitters. Now, I agree that in most cases this is a no-no! However, for these functions it is totally fine. What we need to do is add a curve, so that our flaps only move in one direction, not both. I’ll be showing an example here using OpenTX. But any radio system worth it’s salt will be able to do this easily.
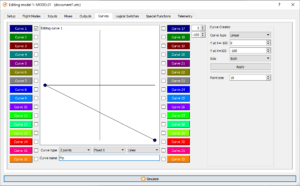
The curve
This is just a simple 2 point curve which has 0 at one extreme, and -100 at the other. This should work well in most situations. But if you want the input to work the other way around, you can either swap the 0 and -100, or change the -100 to 100. By playing with these values, you will find a way that the input works how you want it to.
The mixer
Firstly, you need to decide how you would like the flaps, crow, flaperons, or spoilerons to function. There are 2 choices: a switch or a slider. Using a switch can either give you a simple on/off, or off/half flaps/full flaps setup. This depends on if you use a 2 or 3 way switch respectively. The slider gives you full control over the amount of control surface deployment, from off to full.
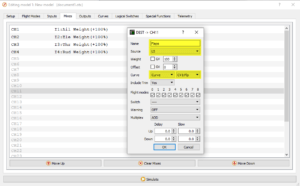
Choose your weapon, then go to the mixer. In this article, I’ll be using channel 11 for the flaps, crow, flaperons, or spoilerons. Of course, you’re free to use any channel you wish. So create a new mixer entry for Flaps on Channel 11.
I’ve highlighted in yellow the parts that I’ve changed here. Firstly, the Name. This is just for our convenience, so we know what that mixer row is for. Next is the Source. Here I have set it to the left slider (LS); but, if you would prefer to use a switch, you would set that here. Finally, we need to set the mix to use our 2 point Curve (Flp).
That’s it, done. If further down in the tutorial you want to add a switch to change the mode of operation or switch off full-span ailerons, just add a standard switch to the mixer, as you would for an arming switch. We will be using Channel 10 for the examples.
As mentioned earlier, this part applies to flaps, crow, flaperons, and spoilerons. However, please check out Testing the setup section for flaperons; as I’ll be including a section in there for testing the switch direction, which I won’t be repeating.
Adding Flaperons in iNav
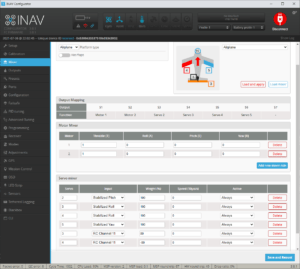
Firstly, what are flaperons? Flaperons are when both ailerons move down to simulate flaps. You use them when you want to generate more lift, but don’t have separate flap control surfaces. You can use these when you have a model that you would like to fly slower. Flaperons will generate more lift with the wing, allowing you to reduce the speed.
So, lets get this show on the road. Go to the mixer in iNav and look for your aileron servos. These will be the ones using Stabilised Roll. We need to check their servo numbers, in this case 3 and 4. Next add two rows to the mixer. These will be our flaperons. Set these up to use servos 3 and 4 respectively. Both of these rows will be using RC Channel 11 as the input. Finally, we need to set the weights, one of the rows to 80, the other to -80. This will give us the starting point. Save and reboot.
Testing the setup
So, plug get your battery in, and lets see what’s happening. Firstly, we’re not concerned with the movement of the surfaces, we want to make sure that the switch or slider is working in the way that you’d like. Move your input and see what is happening. So long as the off position is ok, that’s good enough for this part of the test. If not, go back up to the curve section, and modify the curve on your transmitter, until the off position of the switch or slider is where you want it.
Now that our switch is correct, we can test the movement of the control surface. Fully deploy the flaperons by moving the switch or slider. Now, both ailerons should either be up or down. If they are both down, great; it’s all working as it should. If they are both up, just move the – weight from one flaperon row, to the other. Save and reboot. This should now have the flaperons working correctly.
Tuning the settings
There’s not much tuning to do here. With the 80% weight, there should still be enough roll control to allow you to correct the movement of the plane. If you find that there is not enough roll control, you can lower this percentage. If you find you still have plenty of roll, but would like more flaps, you can increase the weight. But be careful increasing.
Adding Spoilerons in iNav
So, what are spoilerons? Spoilerons are when both ailerons move up to simulate spoilers. You use them when you need to kill lift, but don’t have separate flap control surfaces. These are ideal if you have a model that glides very efficiently, and doesn’t want to land.
Because the setup for spoilerons is almost exactly the same as flaperons, I won’t be repeating it here. Just follow the instructions for flaperons. The only difference is that in the testing phase, you want both ailerons to move up.
Adding Flaps in iNav
You would use flaps when you want to increase the lift generated by the wing. This can give you extra lift for take-off, or allow you to fly slower when landing.
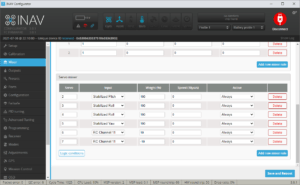
To add flaps in iNav, first go to the mixer. Next add two rows to the mixer. These will be our flaps. Look at the servo numbers currently in use; as we need to continue this sequence. Here, the last servo number is 5. So set these up to use servos 6 and 7 respectively. Both of these rows will be using RC Channel 11 as the input. Finally, we need to set the weight of the rows. If your flaps only move in one direction (down), set the weight to 10 for the first flap row and -10 for the second. However, if they move in both directions, you can safely set the weight to 100 for the first flap row and -100 for the second. This will give us the starting point. Save and reboot.
Testing the setup
Put the switch or slider where you believe flaps off to be and plug your battery. Now test the switch either slowly or to half flaps, to make sure the direction is correct. This is why we have only set the downwards only flaps to 10%, so that it does not over stress the servo if the direction is wrong. If both flaps go down, you’re all good. If they both move up, just move the – weight from one flap row to the other. Save and reboot. Now that both flaps are moving in the right direction, you can set the weights to 100%, if you started at 10%. And don’t forget that save and reboot.
Adding Crow or Butterfly braking in iNav
Crow braking basically adds an air brake to the wing. This will kill the lift and allow models that glide efficiently to land.
The first half of crow, is the same as flaps. So follow the instructions above to set up Flaps. But, instead of using 100% as the final weight, we will be using 80%.

Once the flaps are setup, we will be adding the aileron part of the crow setup. For this, add two more rows to the mixer. These rows need to use the same servo numbers as the ailerons. So 3 and 4 in this example. Set the inputs to RC Channel 11; the same as the flaps. For the weights, take a look at the aileron servos and flap servos on one side your plane’s wing. If the control horns come out of the same side on the wing, set the negative weight opposite row to the flaps (shown below). If the control horns are on the opposite side, set the negative on the same row. I explain this easier in the video. This is just to give, hopefully the right position from the start. We need to set the weights to 80 and -80. Save and reboot.
Testing the setup
The flap half of this will have already been tested. So, we know the flaps are in the right direction and that the switch is how we want it to work. Next we test the aileron part of the crow brakes. Move the switch or slider in to the full position. Both ailerons should move up. If not, change the position of the negative weight on the last two mixer rows. Save and reboot. Now the crow brake should be working fully.
Adding Full-span Ailerons in iNav
Full-span ailerons will give extra rotational response to the model. The flap on each side mimics the aileron next to it, so most of the trailing edge of the wing induces the roll. You should set the flap to about 2/3rds the deflection of the ailerons (tweak as necessary) to reduce the drag they add. To use full-span ailerons, the flap control surface needs to be able to move freely in both directions.

To add full-span ailerons in iNav, first go to the mixer. Look for your aileron servos. These will be the ones using Stabilised Roll. We need to check their servo numbers, in this case 3 and 4. Next add two rows to the mixer. These will control our flaps, to provide the inner aileron function. Both of these rows will be using Stabilised Roll as the input. Finally, we need to set the weight of the rows. Set the weight to 60 for the starting point. This is about 2/3rd of the 100 weight of the main ailerons. Save and reboot.
Testing the setup
With this setup, there’s not much to test. Move your roll stick right. Both control surfaces on the right wing should raise, and both surfaces on the left wing should lower. If you find that the inner surfaces are backwards. Just make both of the last two row’s mixer weights negative. Save and reboot, and it should all be correct.
Switching the functions
If you want to disable the function at any point, you can add a switch. The simplest way to do this is in OpenTX. This will work fine for the flaps, crow, flaperons, or spoilerons. But to disable full span ailerons, we need to use the iNav programming page.
Basic on/off switch in OpenTX
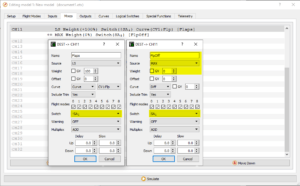
Adding an on/off switch for crow, flaps, flaperons, or spoilerons in OpenTX is really simple. First of all, go to the Mixes and edit the Flaps mix on Channel 11 (left DEST -> CH11 box in the example). All we are doing here is setting a switch and position for when you want the flaps function to work. OK that box, before we create the off state. You now need to add a row to the Channel 11 mix. You can do this with long pressing the enter key on your radio or right clicking the mouse in companion, on CH11. This new mix (right DEST -> CH11 box in the example) needs to be of source MAX, have a weight of 0, and have the switch in the inverted position of the Flaps on switch. This will turn off the flaps whenever SA is down, in this example.
Switching off full-span ailerons in iNav
Unlike the functions above, full-span ailerons just use the Stabilised Roll input from iNav. Therefore, we can’t turn them off with a simple OpenTX switch. Well, remember the switch we said could be added to Channel 10 at the start of this article. Well now we get to use it.

Head in to Programming in iNav. Enabled a Logic Condition (0 in this example). The Operation will be High, and Operand A is set to RC Channel and 10. When our switch is in the down position, this Logic Condition will activate. Don’t forget to click Save.
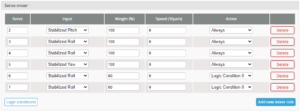
Next, we need to head back to the mixer. In here we can add the Logic Condition 0 as our Active condition for the two full-span aileron rows.
That’s all there is to it. We now have switchable full-span ailerons.
Combining iNav flap based functions
Now that we’ve added flaps in iNav, and more besides. What about if we want to use more than one. Well, we can. Below, I’ll show how to have multi-setups for both 2 and 4 control surface wings. But, what we need to do first is add a couple more Logic Conditions. I’m not going to go in to detail, as it’s pretty self-explanatory. But, here’s a picture to confirm. For just a flaperon and spoileron setup, just use the Logic Condition 2 below as Logic Condition 1. You only need the two Logic Conditions.

Full house (4 control surface wing)
Now that we have three switch positions. We can be greedy and have full-span ailerons, flaps, and crow. Again, the setup here is basically things that have been covered already. But I’ve added an image to confirm things. Logic Condition 0 is the full-span ailerons, Logic Condition 1 is flaps, and Logic Condition 2 is crow/butterfly braking.
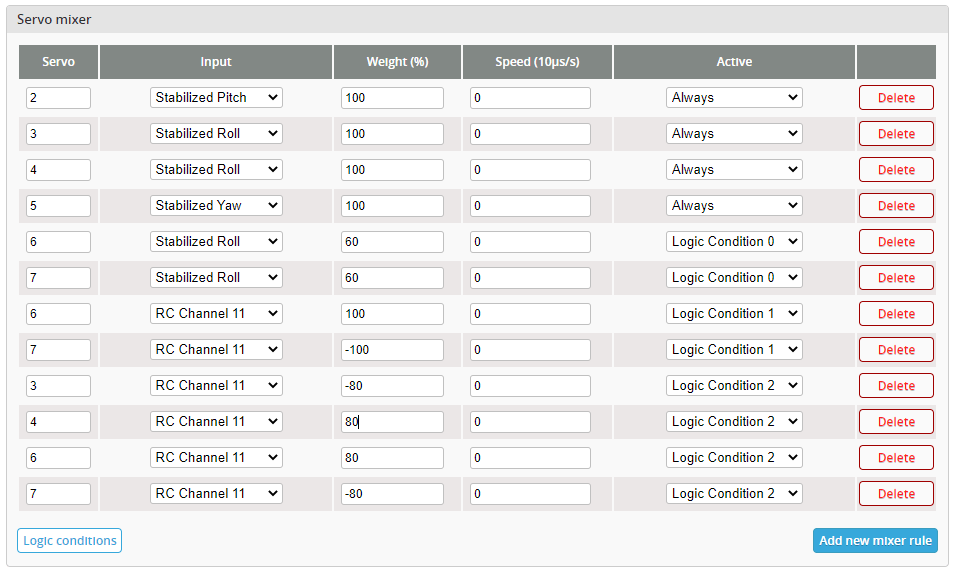
Flaperons and Spoilerons
For this setup, we only have two Logic Conditions, 0 is the switch High, and 1 is the switch Low. The middle position of the switch will disable both. Again, all has been covered in this article. So here is a confirmation image.

Elevator compensation
The last thing I’ll mention in this article is elevator compensation. As in the video, I will mention that in stabilised modes, it’s not needed at all. The stabiliser will cover that. However, if you fly a lot in manual, you may want to add some. There are 2 stages to this:
Compensation activation
As I mentioned, this is only needed in manual. So we will add a line of programming to only activate the compensation when we’re in manual.

Adding the compensation
Below is an example mixer showing flaps and the elevator compensation (last row). The servo is set to the same number as Stabilised Pitch. The input is the same as the flaps, RC Channel 11 in our example. Active is set to the Logic Condition 0 that we created above, to detect when we are in the manual flight mode. I’ve not yet mentioned the weight. You will need to set this to have a little down elevator. The deflection needed will be completely based on the plane, so you will have to work this out with trial and error. It’s better to start with too little compensation, and have the plane balloon up; than with too much, and the plane nose down.

There you have it. You’ve come to the end of the adding flaps in iNav article. I hope this was helpful. Don’t forget there’s also the accompanying video, which also show how to add crow, flaps, flaperons, spoilerons, and full-span ailerons in iNav. If you do watch it, please give it a like; and don’t forget to subscribe for more videos and tutorials.


